Year 9 - Cubism Unit
( if you miss the lesson for any reason you should still complete both classwork and homework)
This unit of work is about:
Leaning about Cubism
Using Cubist techniques to develop portraits in a variety of materials
Researching and writing about art and artists using social and historical references
UNIT ARTISTS: Cubism, Pablo Picasso (Les Demoiselle d’Avignon), Georges Braque, Iberian Sculptures, African Masks, Art Deco, Frank Gehry (The Guggenheim Museum), Anthony Caro, Henri Matisse, Andy Warhol
UNIT VOCABULARY: Cubism, Painting, Sculpture, Mixed Media, Collage, Drawing, Sketch, Plan, Design ideas, Imagination, Colour Pencil/Crayon, Flat Colour, Blended Colour, Outline, Fragmented, Angular, Abstract and Semi-Abstract Art, Fashion, Architecture
Research Art Criticism, Fact, Personal Opinion, Descriptive Details
Lesson 1
Classwork : Students watch the ‘A Simple Introduction to Cubism’ video below (there are a selection of ‘Cubist’ inspired lettering styles at the end of the video, found from a simple Goggle search). They also watch the ‘What is Cubism (Tate Gallery video’) which will help to further clarify the different types of Cubism. Teachers may choose to question students about the understanding of Cubism and what has been discussed in the vtwo videos
Finally, play the ‘Portraits and Cubism Headings - Excellence and Above’ video below.
Students then start the 'Portraits and Cubism' Cover Page on the first page of sketchbooks, although they may choose practice some lettering styles in the back of sketchbooks initially. Lettering should be in a cubist style using colour pencil and fine liner. This work will be complete over two lessons and homeworks.
A Simple Introduction to Cubism
What is Cubism? (Tate Gallery video)
Portraits and Cubism Headings - Excellence and Above
Example Work (Secure - to Excellence +)


Homework: Students aim to complete about half of the 'Portraits and Cubism' Cover Page lettering.
Lesson 2
Classwork : Students can watch the ‘Portraits and Cubism Headings - Excellence and Above’ video from Lesson 1 again. They then complete the 'Portraits and Cubism' Cover Page on the first page of sketchbooks. Photographs will also be taken of students during this lesson for the portrait aspect of the unit.
Homework: Complete the 'Portraits and Cubism' Cover Page. Students should look closely at the ‘Portraits and Cubism Headings - Excellence and Above’ video.
Lesson 3
Classwork : Students can use the first 20 minutes of the lesson to improve the 'Portraits and Cubism' Cover Page. They should consider the following,
How inventive are the ideas/lettering?
Do they recreate the characteristics of Cubism such as fragmentation, multiple viewpoints and abstraction?
Are the colours bold, and are there variation in the colouring/shading?
Is the use of fine liner effective, and is the thickness of the outline varieed to help create a three-dimentional design?
Students then watch the ‘An Introduction to Cubism’ video below and answer the questions on the ‘Introduction to Cubism Questionnaire’. The questionnaire should be stuck neatly onto the second page of sketchbooks.
An Introduction to Cubism
Homework: Books are collected to mark the 'Portraits and Cubism' Cover Page, and the ‘Introduction to Cubism Questionnaire’.
Lesson 4
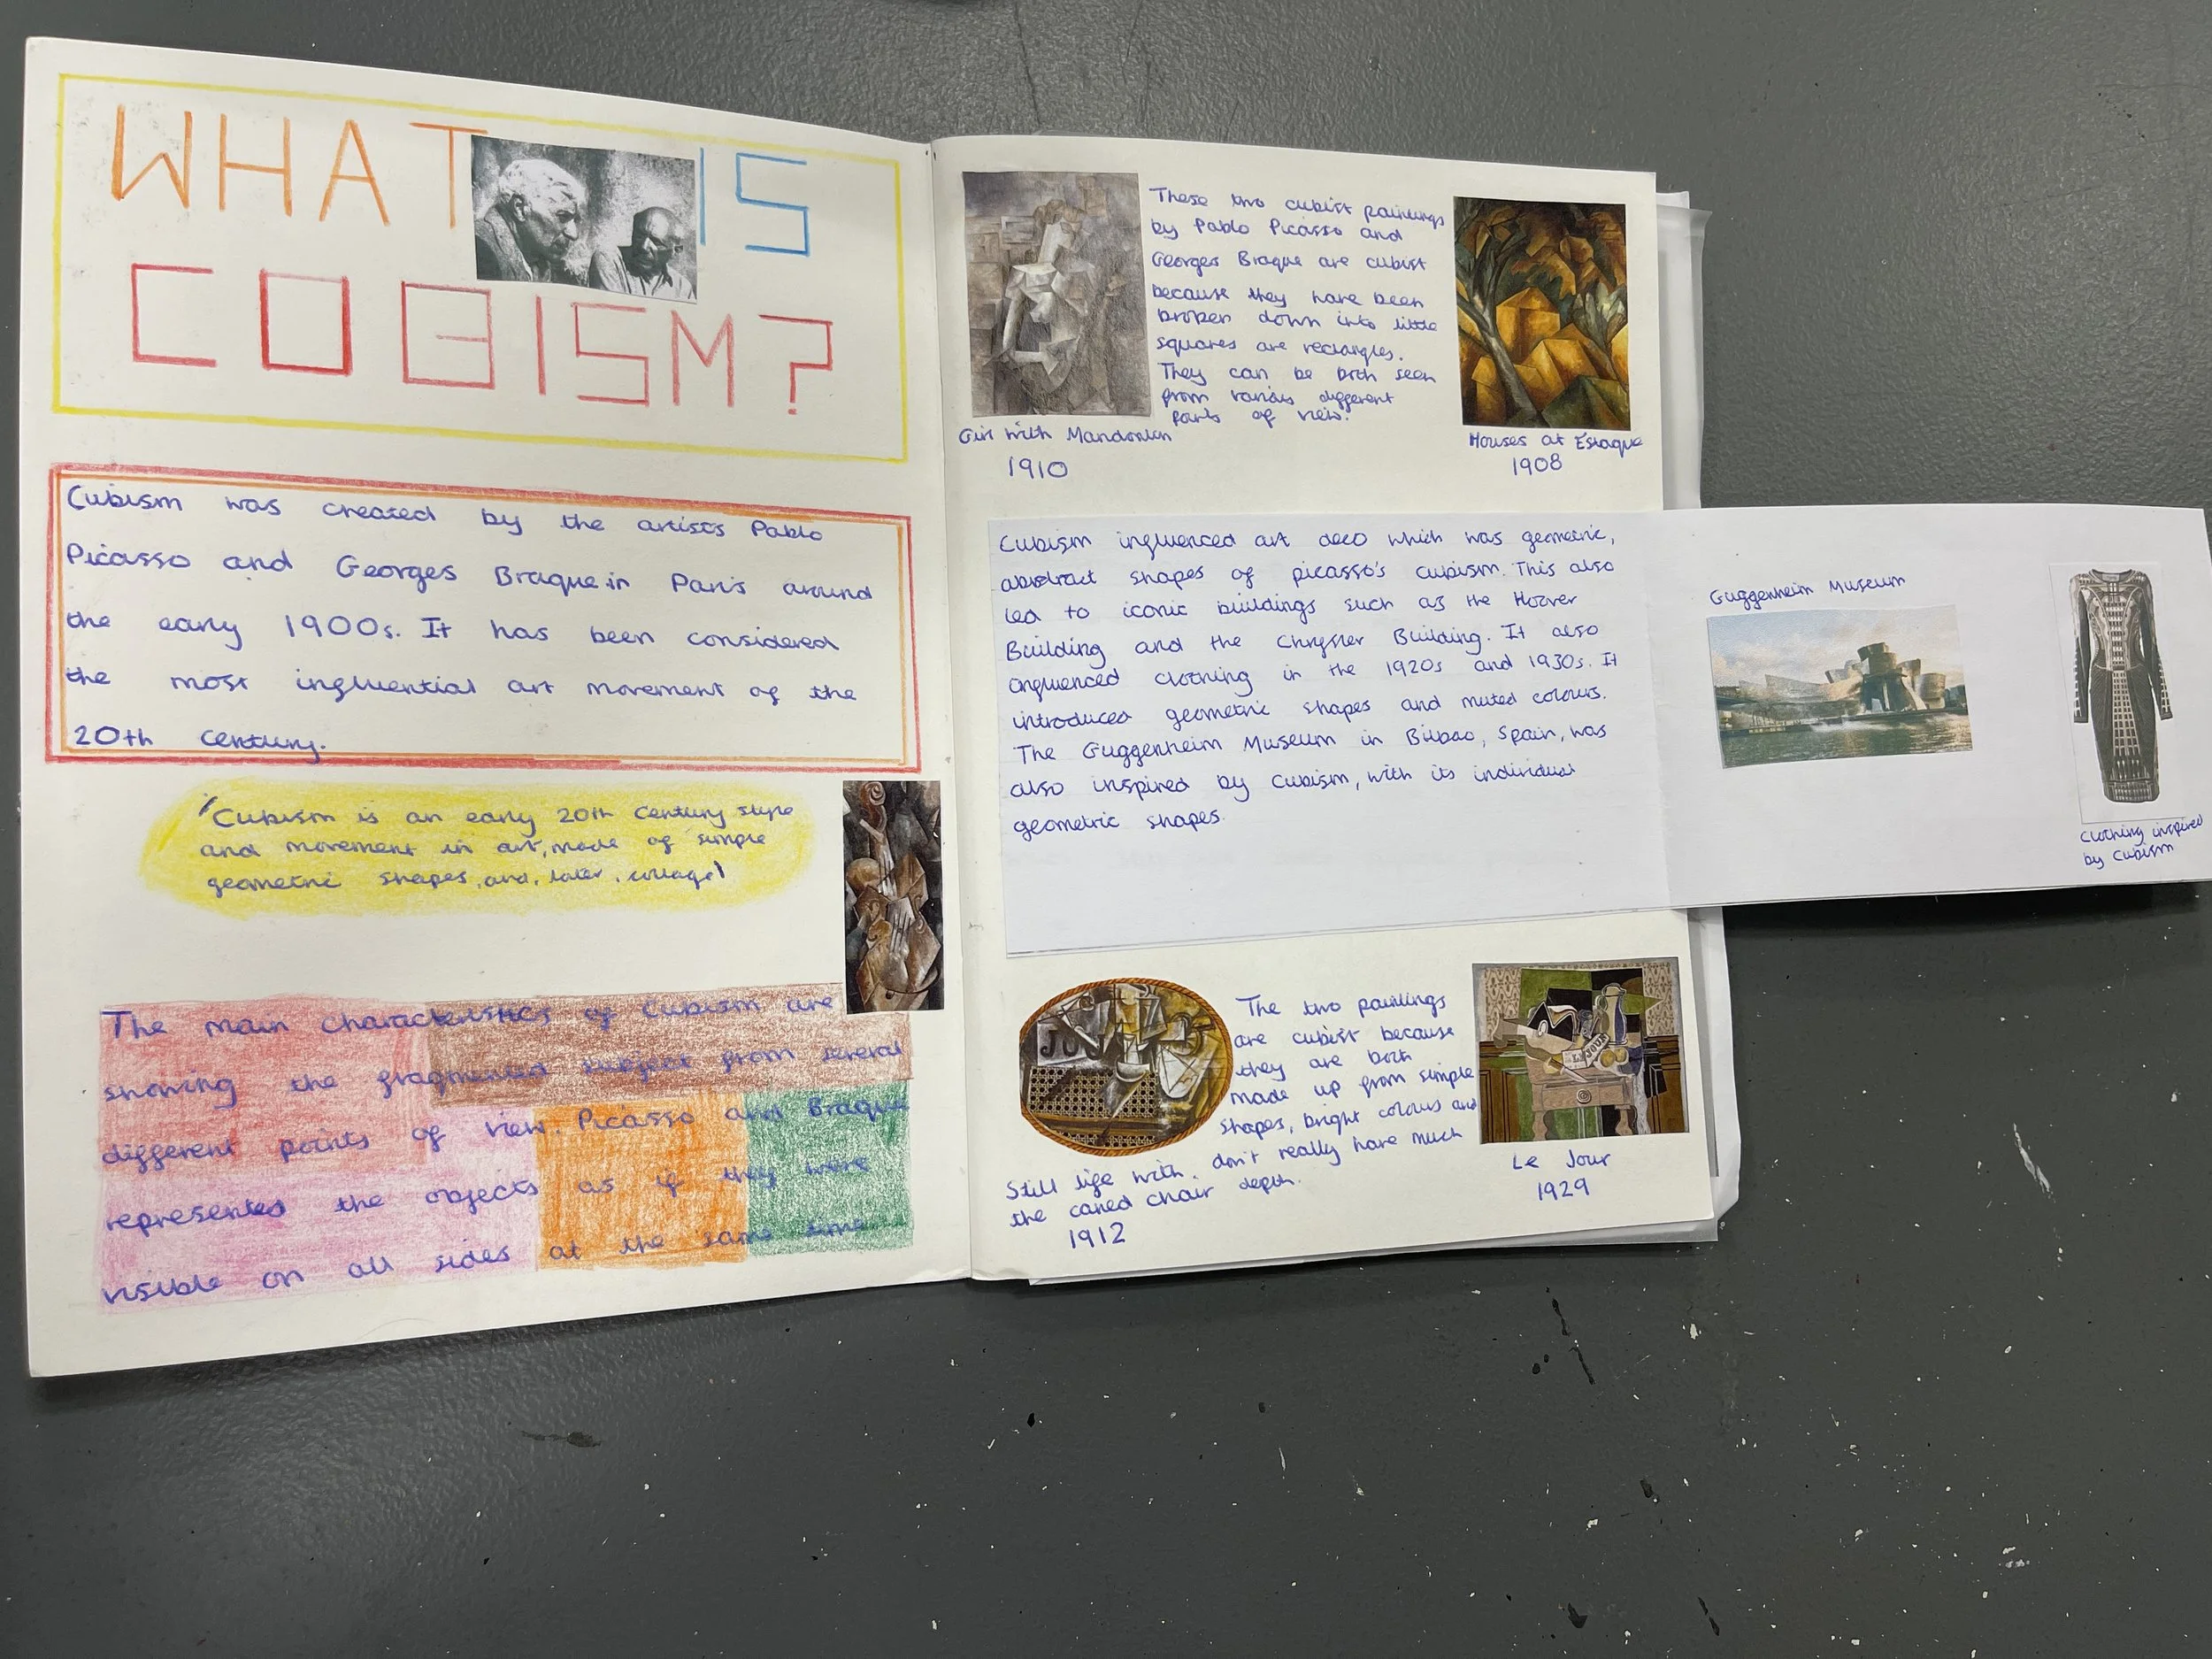
Classwork : Using 2 sketchbook pages start students to write up information on Cubism, using only the information given on the handout and their understanding of Cubism (gained from the video on Cubism and questionnaire). Students may however, choose to collect addition pictures if they wish.
THIS IS NOT A RESEARCH TASK. This work is all about PRESENTING INFORMATION IN EXCITING & CREATIVE WAYS and APPLYING EXISTING KNOWLEDGE (from the Cubism video) to the tasks. Students will have the two lessons, and homeworks, for this task.
Students may wish to complete a plan of their ‘double page’ layout in the back of sketchbooks. Example work can also be seen below. It might be very difficult to achieve a ‘Secure’ mark on just two pages without flap-outs.

Main Guidance:
SECTION 1 - only use the information from the handout (although students may wish to supplement this with the knowledge gain from the “An Introduction to Cubism’ video seen in lesson 3).
SECTION 2 - students need to write about the 4 Cubist pictures on the handout (2 Analytical and 2 Synthetic Cubism pictures). Students re-write out the information in their words. They might also choose the label the pictures, instead of writing in conventional paragraphs.
SECTION 3 - In this section students will use they own words, with the pictures on the handout, to explain how Cubism influenced Architecture, Fashion and Abstract Art. Students may need to re-watch the ‘An Introduction to Cubism’ video to complete this section to the required standard.
Example work can be seen below.
Developing+ 1st page good presentation but missing key pictures. 2nd page seem unfinished.

Secure Secure+ presentation but missing pictures on what Cubism influenced

Secure+ excellence presentation but missing pictures on what Cubism influenced

Excellence this shows it is possible to include everything on 2 pages without flap-outs
Homework: Students make a good start on the first section of information on Cubism. See the guidance information above, and also the handout sheet can be downloaded should students wish to re-size any of the pictures.
Lesson 5
Classwork : Students continue to work on Section 1 of the Cubism research work.
Homework: Students completed the information for Section 1 on Cubism. Remember that presentation is worth more than half of the marks.
Students also need to prepare for Section 2 (plans, print-outs etc) so they can make good use of the next lesson. Remember you will not be permitted to use the computers in the lesson. In the lesson you must be completing the sketchbook pages (drawing-out, colouring, drawing headings, making flap-outs, writing, sticking in printed pictures etc).
Lesson 6
Classwork : Students start to work on Section 2 of the Cubism research work.
Homework: Students completed the information for Section 2 on Cubism. Remember that presentation is worth more than half of the marks.
Students also need to prepare for Section 3 (plans, print-outs etc) so they can make good use of the next lesson. Remember you will not be permitted to use the computers in the lesson. In the lesson you must be completing the sketchbook pages (drawing-out, colouring, drawing headings, making flap-outs, writing, sticking in printed pictures etc).
Lesson 7
Classwork : Students start to work on Section 3 of the Cubism research work.
Homework: Students completed the information for Section 3 on Cubism. Remember that presentation is worth more than half of the marks.
Students also need to ensure all sections are a good as possible in readiness for assessment next lesson.
Lesson 8
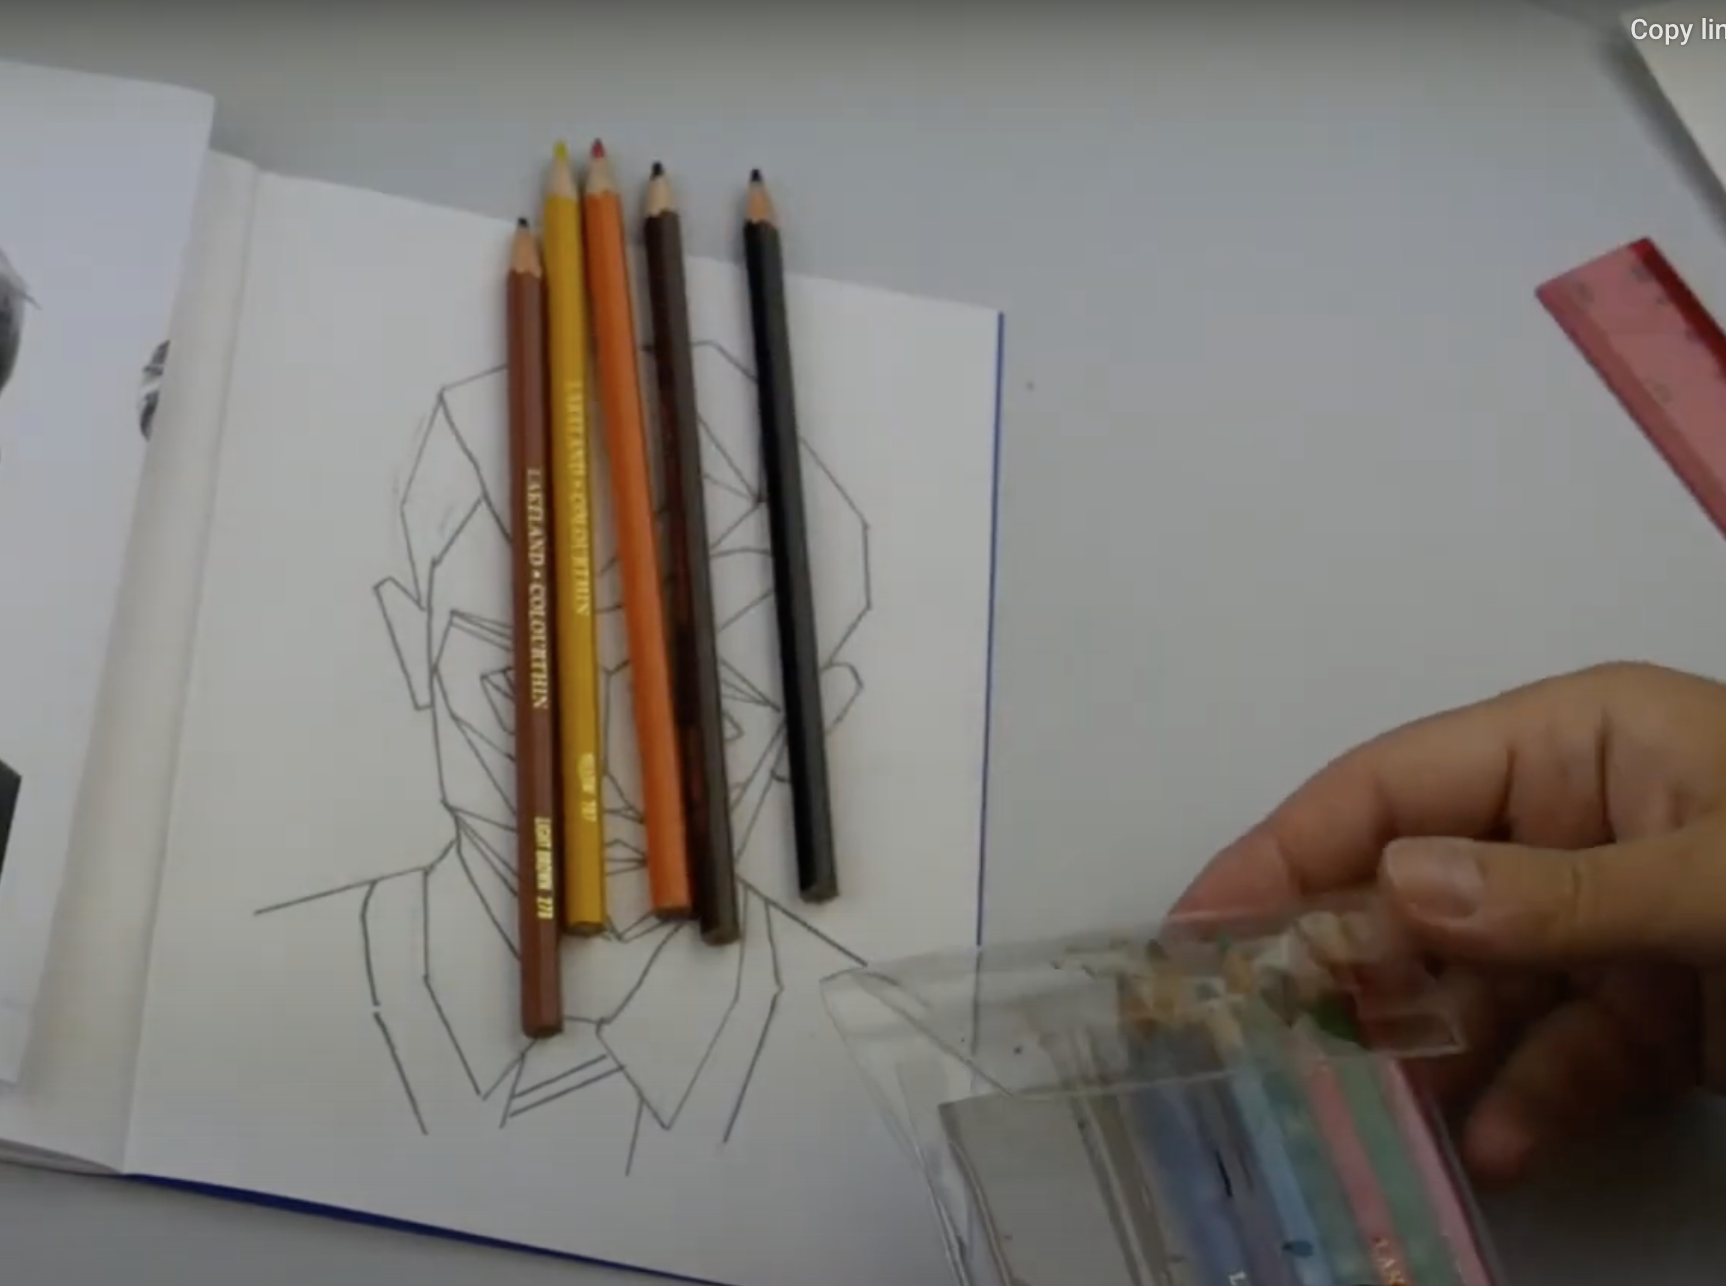
Classwork : Students watch the ‘Analytical Cubism Portrait 1’ video below and then draw the outline and structure of their analytical style self-portrait. Student have already been given self-portrait photographs and tracing paper.
Next lesson students will start to add colour using colouring pencils.
Analytical Cubist Portrait 1 - Drawing the Structure
Homework: Sketchbooks will be collected for marking but will be returned to students to complete the homework below.
Students complete the self-portrait outline in the style of Analytical Cubism ’ as described in the video above (Do not add colour). Also bring in a good selection of colouring pencils for the next lesson as shown in the picture below (two browns, yellow, orange, and black).
Lesson 9
Classwork : One half of the class will spend the next 2 lessons (Lessons 9 & 10) adding colour to the self-portrait in the style of Analytical Cubism. These students will watch the ‘Analytical Cubism Portrait 2’ video below and then start to add colour, using colouring pencil, to their Analytical style self-portrait.
Analytical Cubist Portrait 2 - Adding Colour
The other half of the class will spend the next 2 lessons (Lessons 6 & 7) producing a Cubist style portrait on the computers. Follow the link below to access these 2 lessons.
Homework: Complete adding colour to about half of the Analytical style self-portrait.
Lesson 10
Classwork : Students continue to add colour using colouring pencil to their Analytical style self-portrait. Student should look again at the different standard examples of work shown at the end of the ‘Analytical Cubism Portrait 2’ video in Lesson 7, as well as the examples below.

Students working on the computers should again use the link shown in Lesson 7 to follow the lesson and homework for producing a Cubist style portrait on the computers.
Homework: Complete adding colour to the Analytical style self-portrait. It is optional to add a background.
Lesson 11 & 12
Classwork : This is now a swap-over lesson.
The half of the class that has produced an Analytical Cubist style self-portrait using colour pencil will swap to working on the computers. All information for this work can be found by following the link below.
The half of the class that has completed the Cubist style portrait using the computers will complete their Analytical Cubist style self-portrait using colour pencil as described on sacart in Lessons 9 & 10.
Homework: See lessons 9 & 10 above.